
Christmas DIY Create Your Own Small World | MiniZoo Blog

Now that it’s December, we can, in good conscience, set up our Christmas trees (if you haven’t already), turn on the carols, and completely immerse ourselves in the festive spirit.
This year we’re decorating with a little help from MiniZoo figures and supplies, and nature as well, so get your Christmas hats on (and your creative caps too!).
To make this special Christmas small world at home, you will need:
- A play table, board or surface to work on
- Something green to cover the floor of your surface with – I’ve used a grassy felt
- A handful of sticks and bark from your local park
- A small amount of soil
- Wood glue
- Any other pieces of nature you’d like to include in your small world (I’ve used a mix of miniature pine cones)
- Woodland Scenics 4” to 6” Pine Armatures
- Woodland Scenics Clump Foliage (Dark Green)
- Hob e Tac or other craft glue
- Woodland Scenics Soft Flake Snow
- BluTac
- (Optional: Woodland Scenics Scenic Cement and Sprayer)
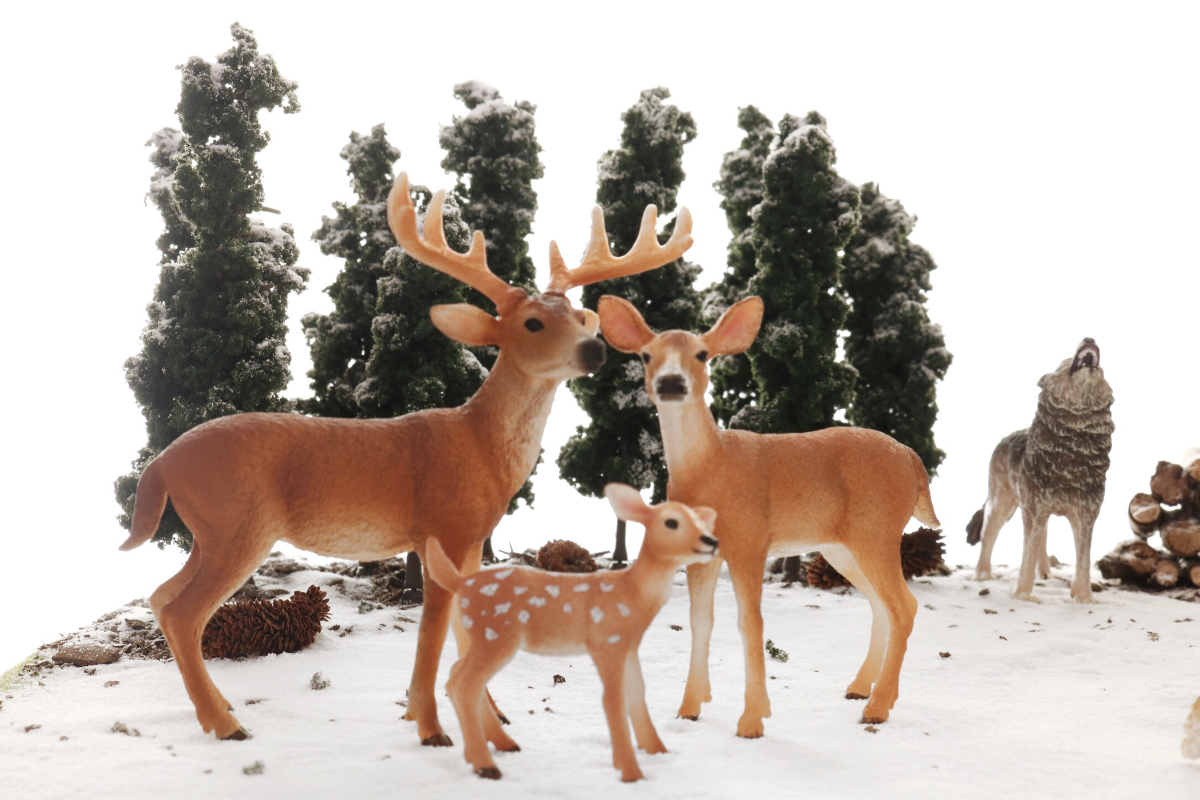
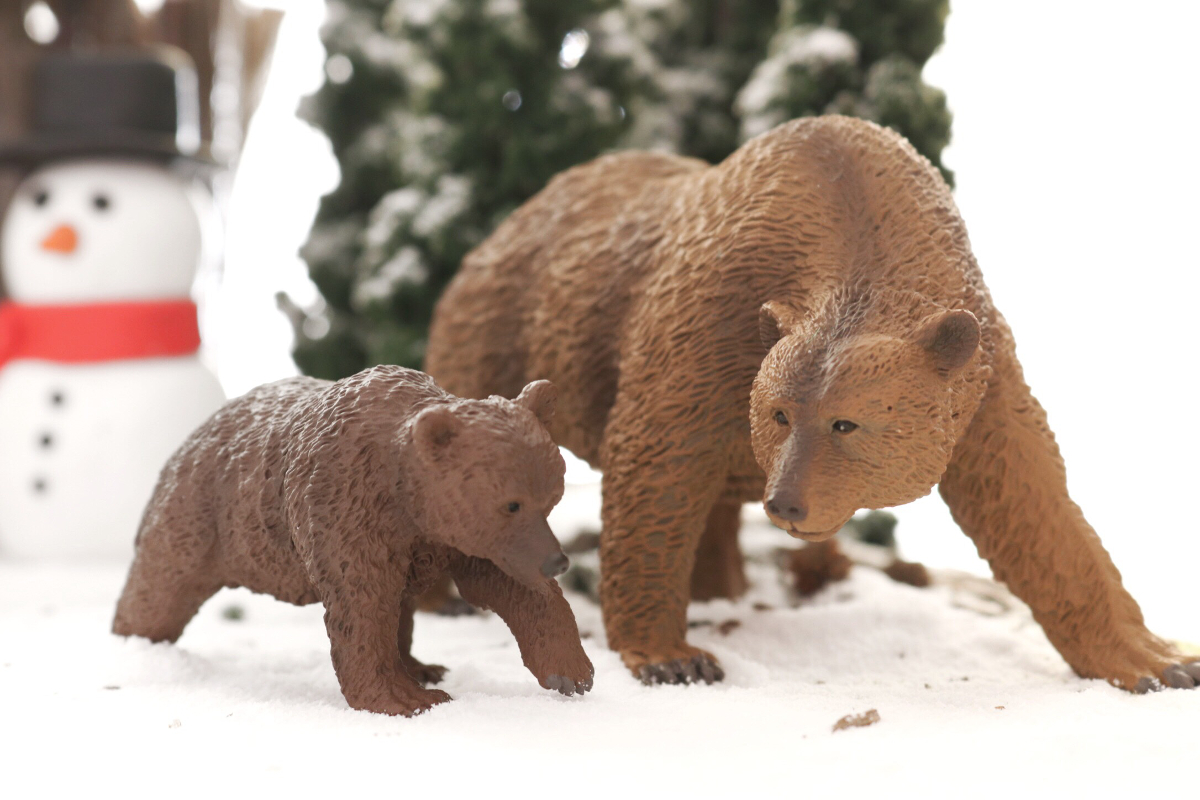
- MiniZoo animal figures – I’ve used the Brown Bear and Brown Bear Cub, Rabbits, and the Howling Timber Wolf from CollectA. From Schleich I’ve used the White-Tailed Buck, Doe and Fawn, as well as the Fox.
- Polymer clay in a range of colours (I’ve used red, green, white, black, brown and orange)
Nature play is a brilliant way to inspire your little ones. It encourages our kids to get out and play in the great outdoors, collecting bits and pieces to use later, learning about how the world works, and of course the benefits of fresh air work wonders. While out on our walks, Norah and I have been collecting sticks and pine needles to build a little woodland style house, and some miniature pine cones to scatter around.
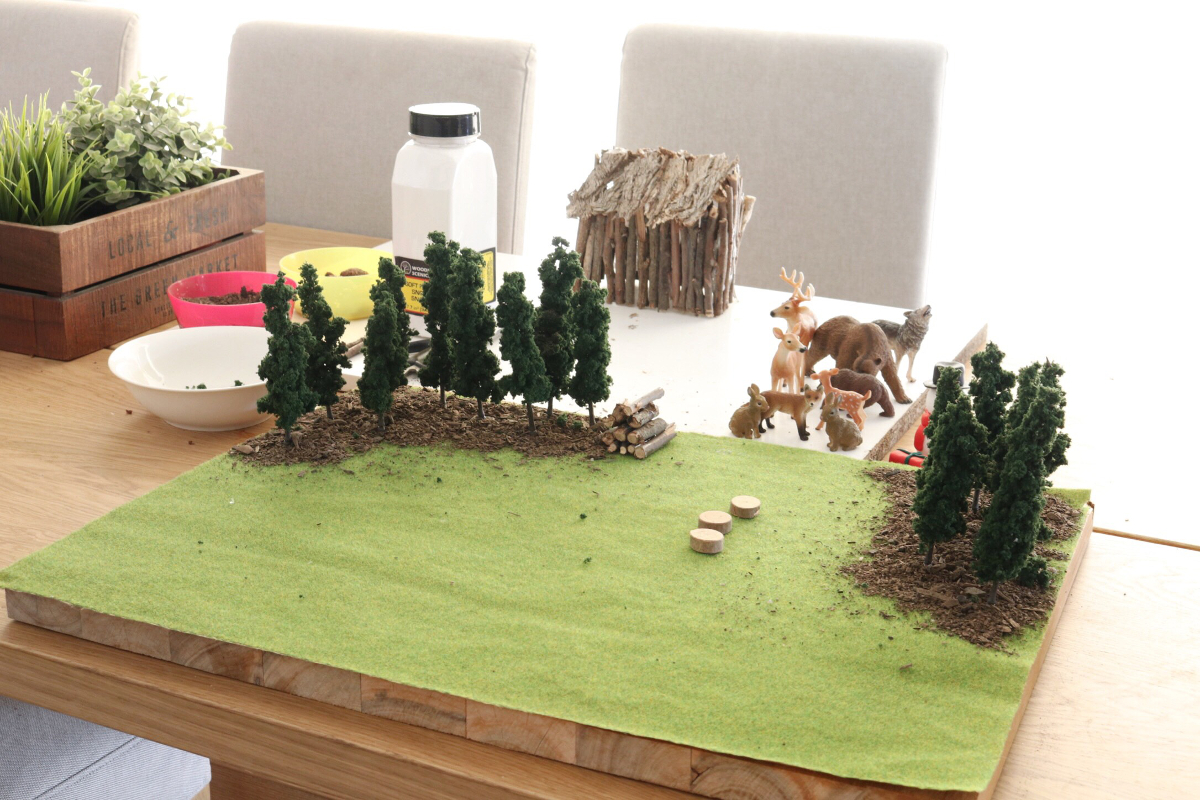
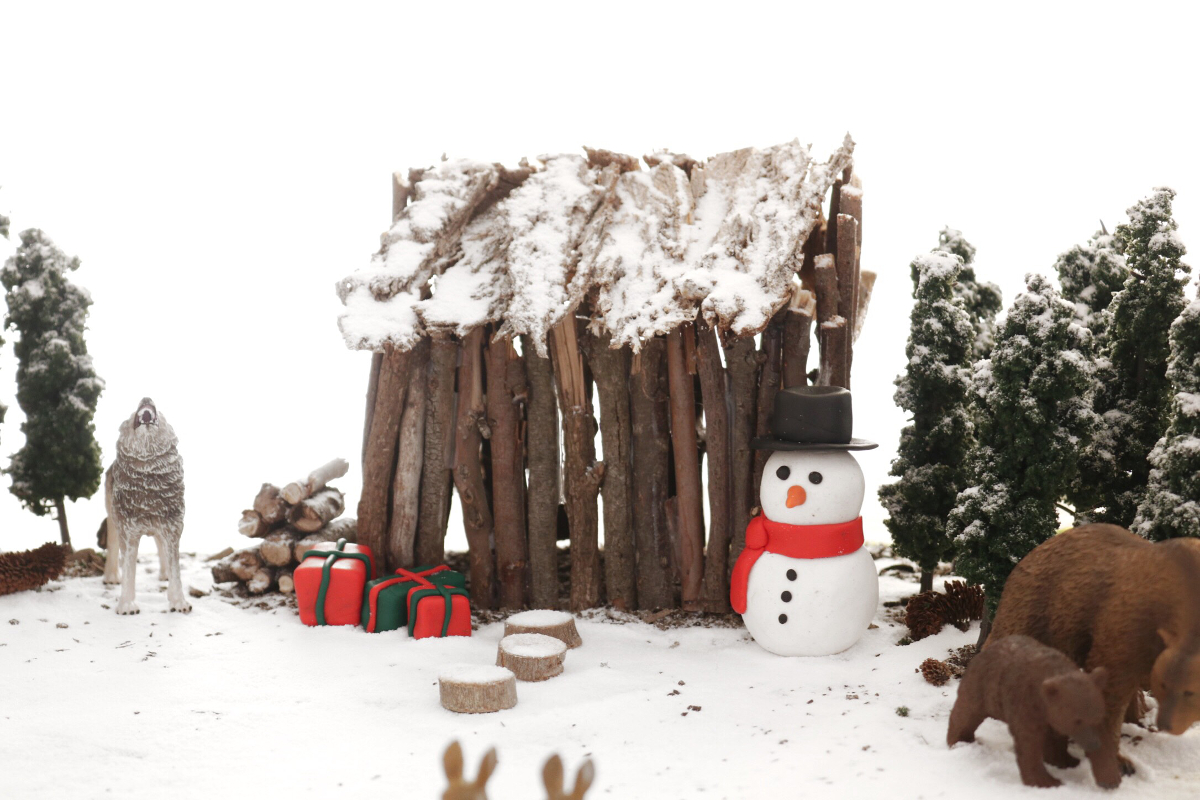
To make the little wooden house, you’ll need your sticks from the park (or backyard). Ask an adult to help you cut them to size using branch cutters or garden loppers – or even a little handsaw will do. I cut ours to roughly 10cm in length for the two long walls. You’ll need to be a little craftier with the front and back walls, cutting them slightly differently to ensure they get taller, and therefore make a point to ensure the roof is sloped. Use wood glue to secure your sticks, panel by panel, to create some structural integrity. For the roof, I’ve use a couple of pieces of bark, gluing them together to make the roof panels. I also chose to trim the ends slightly to ensure they were roughly the same length, but don’t worry if it’s not perfect – it will just add some rustic charm to the scene.
The trees are made from materials in MiniZoo’s Woodland Scenics range. We’ve used the 4” to 6” Pine Armatures and the dark green Clump Foliage to create our beautiful pine trees. They’re bendable, allowing you to make them more realistic and three-dimensional. To do this, you simply twist the trunk and branches in a spiral fashion until they point in different directions. To glue the foliage, use Hob e Tac (or a nice, sticky craft glue) and paint the glue onto the branches. Avoid gluing the trunk area where foliage doesn’t naturally grow. Then pinch the clump foliage onto the branches, ensuring to fill any gaps until you’re happy with the spread of greenery.
We’ve filmed the process of making these trees, so if you haven’t had a chance to play around with Woodland Scenics range yet, you can see just how easy it is – and how effective the end product looks as well. The process is the same for all Woodland Scenics trees, so just choose which style you like and have a go! (We’ll also do a few more Woodland Scenics how-to videos in the future so stay tuned for those).
When making the trees, don’t be discouraged when some of your Clump Foliage falls off. This may happen when the glue is still too wet, or the foliage you’ve just pressed on didn’t quite meet the glue. Simply try again – I promise, it will stick, and it will turn out great.
To attach your beautiful trees to your surface, you can use the bases provided in the Woodland Scenics kit if you wish, or if your surface allows it, poke a small hole in the floor of your small world and insert the base pin of the tree into the hole to stand it up. We’ve used the tree bases, BluTac to secure them in their spot, and then sprinkled some soil over the top to hide the base.
To turn your woodland forest clearing into a beautiful, white, winter wonderland, you’ll need the Woodland Scenics Soft Flake Snow. (Optional: If you want your snow to stay put and be glued down, use the Woodland Scenics Scenic Cement and Sprayer first, lightly spraying your scene before you get the snow out).
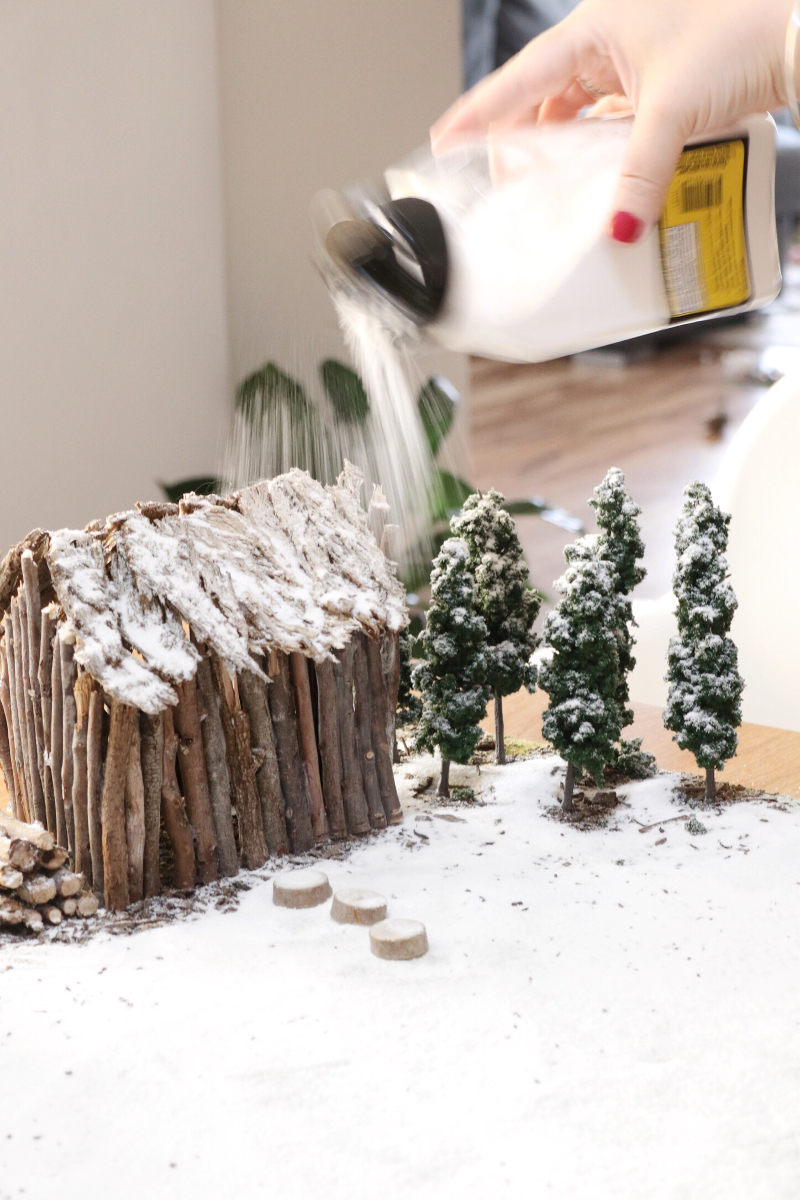
Simply sprinkle the beautiful snowflakes over the entire scene. It’s completely up to you if you’d prefer to do a light dusting or mimic a heavy snowstorm aftermath. Again, try to make it look authentic, sprinkling the snow where it would likely naturally fall, though you may need to specially coat the forest floor in a light layer of white as the foliage might catch a lot of it. We decided to place our pine cones after we sprinkled with snow, so that you can still see them and they don’t become hidden beneath the white flakes. For this scene, I’ve used about one third of a container of the Soft Snow Flake, so you can see that a little goes a long way. It’s also quite fine (almost sand-like) which helps to make it look really authentic.
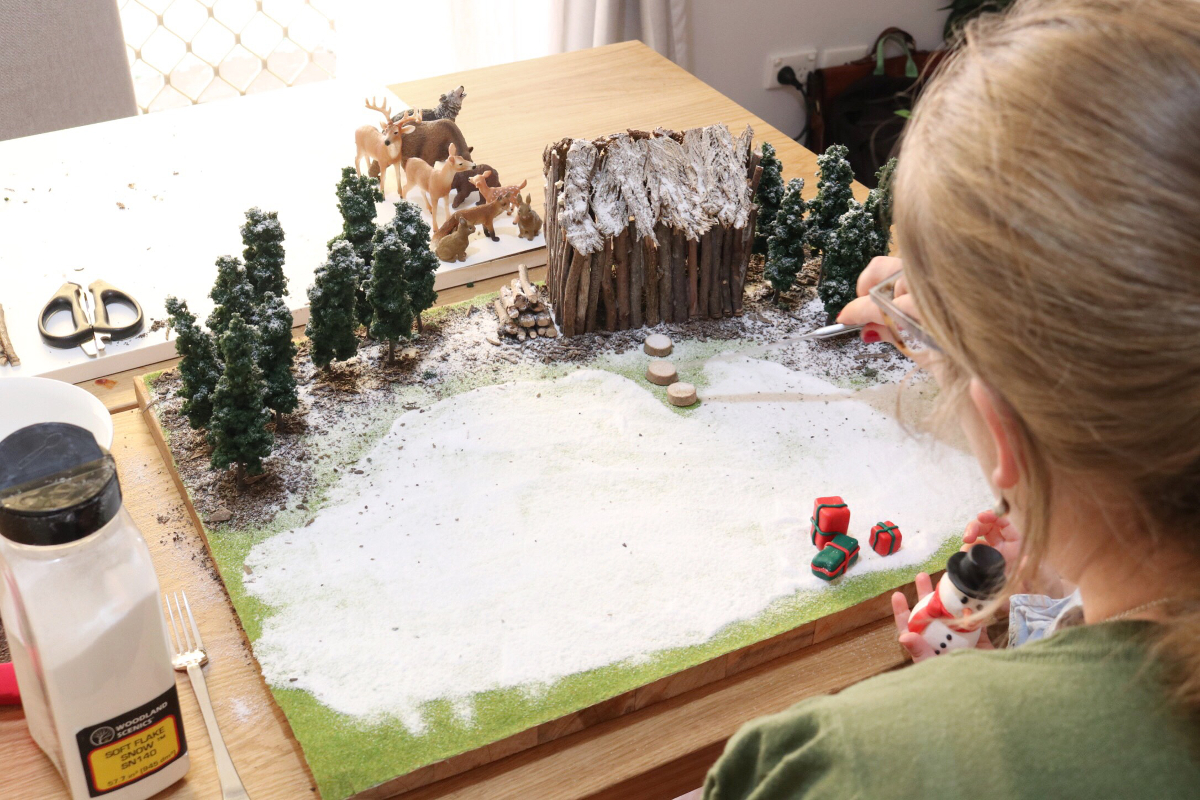
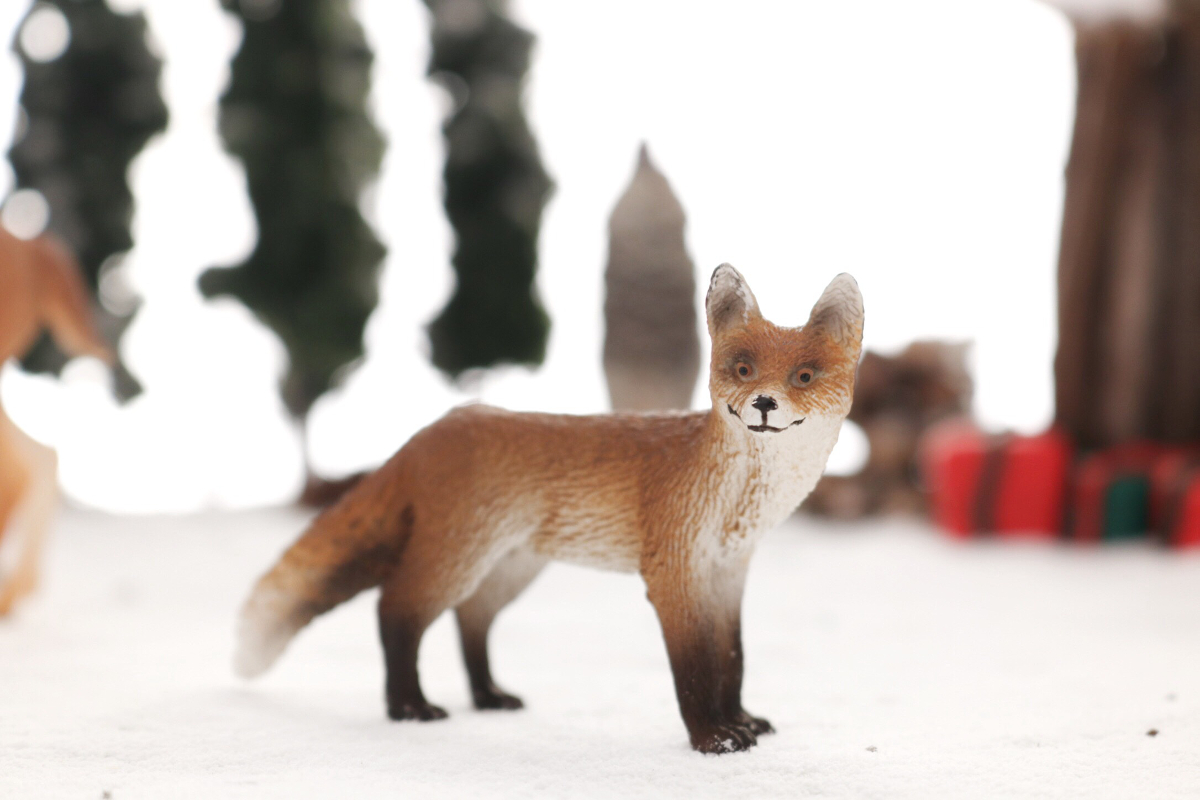
As stated above, I’ve chosen a few different MiniZoo figures for our woodland Christmas scene. We know that Christmas-time is a great opportunity for families to come together, and some of our animals have done the same. My deer family is from MiniZoo’s Schleich collection, featuring the White-Tailed Buck, the White-Tailed Doe and the White-Tailed Fawn enjoying a family walk through the snowy scene. The Fox similarly comes from the Schleich range. The Brown Bear and Cub from CollectA are also enjoying Christmas Eve in the woods, along with two sweet bunnies and a lone Howling Timber Wolf.
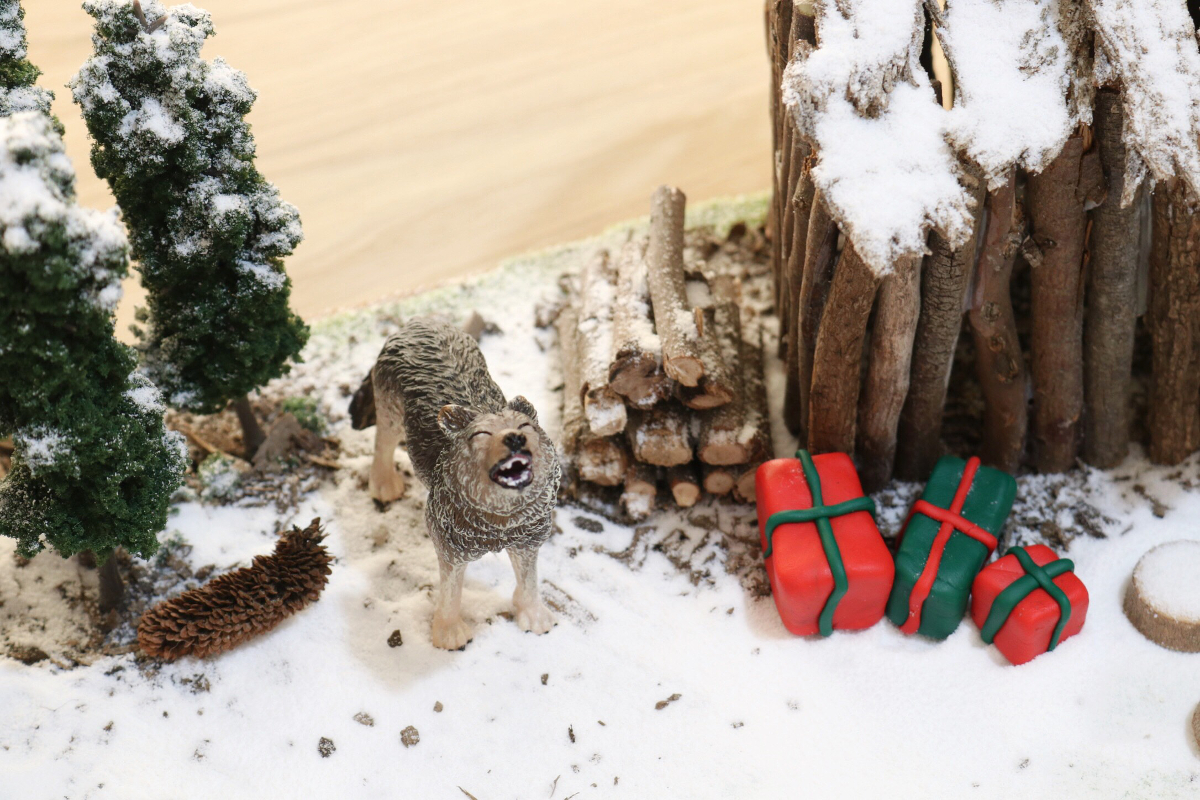
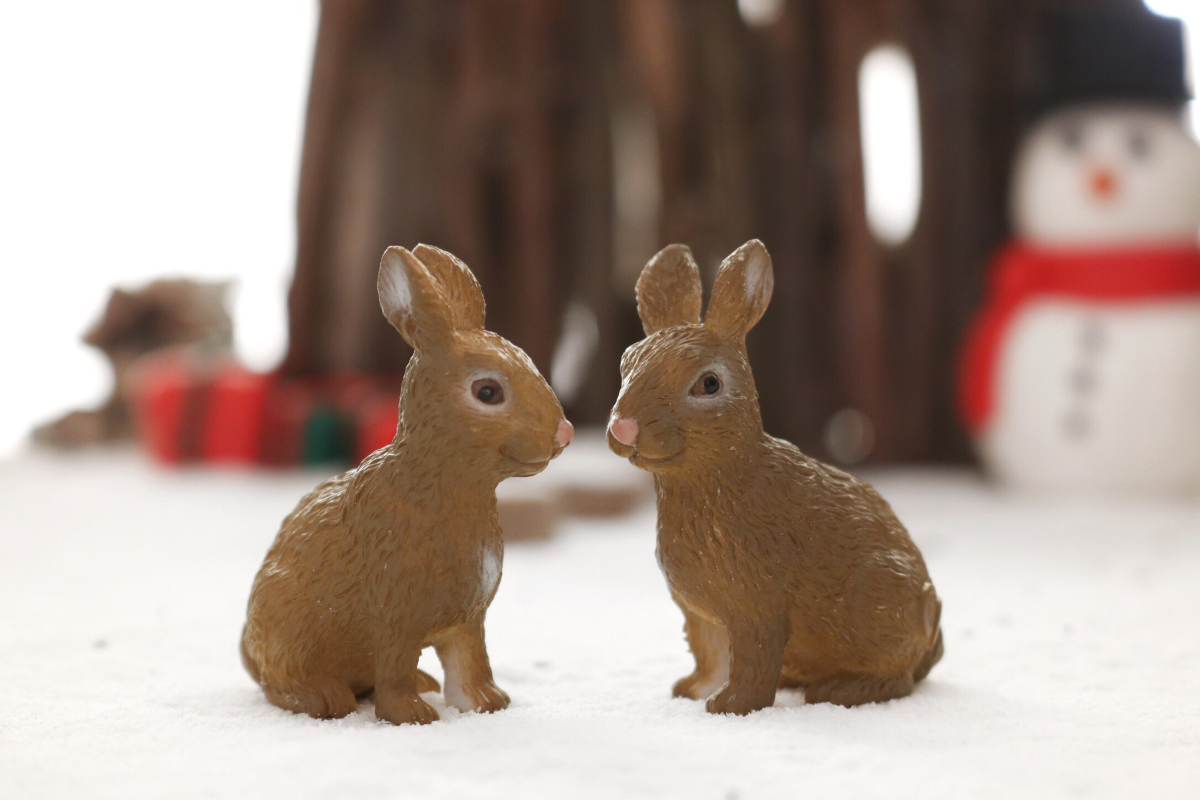
The polymer clay is for sculpting some more fun Christmas items. (This step is a particularly good one for the kids). We’ve made a cute snowman with a scarf, top hat, and of course, carrot nose. We also moulded some Christmas gifts that Santa must have just dropped off on his Christmas Eve route. Depending on the clay you use, you may need to use the oven to set your sculptures, so ensure an adult completes this step and follow the instructions on your clay packet.
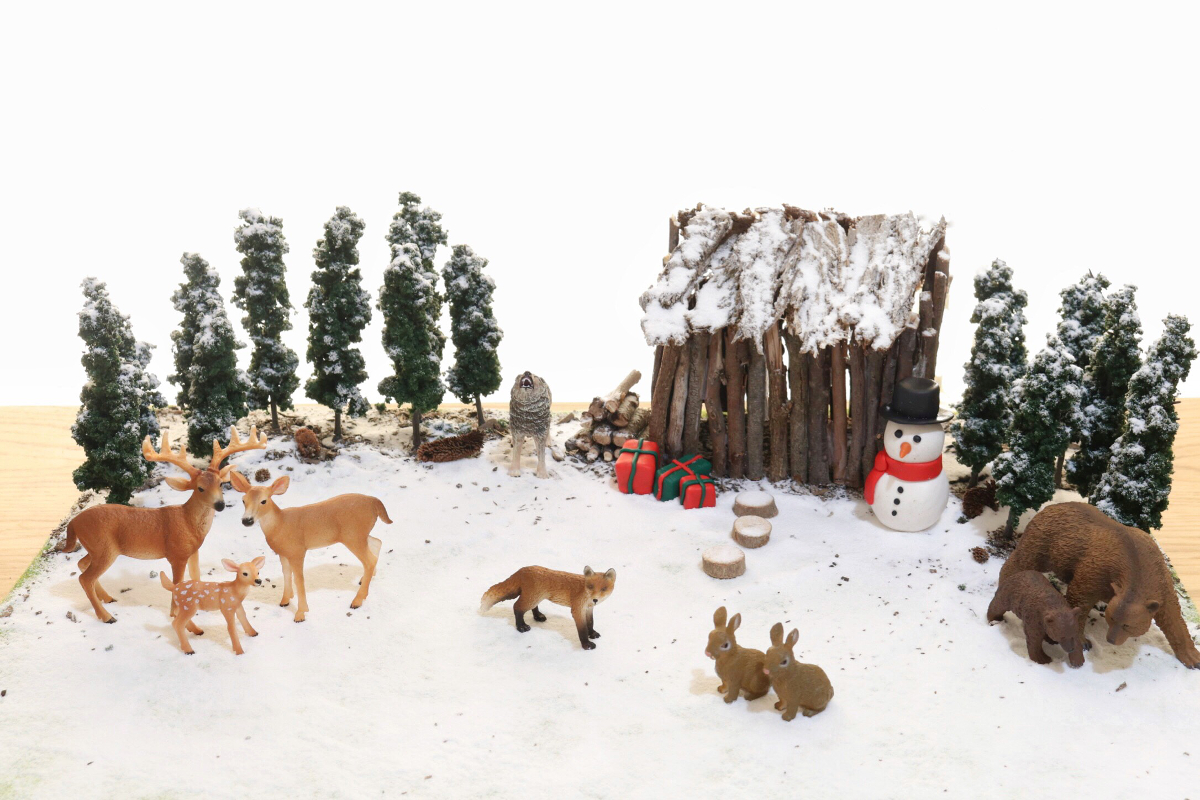
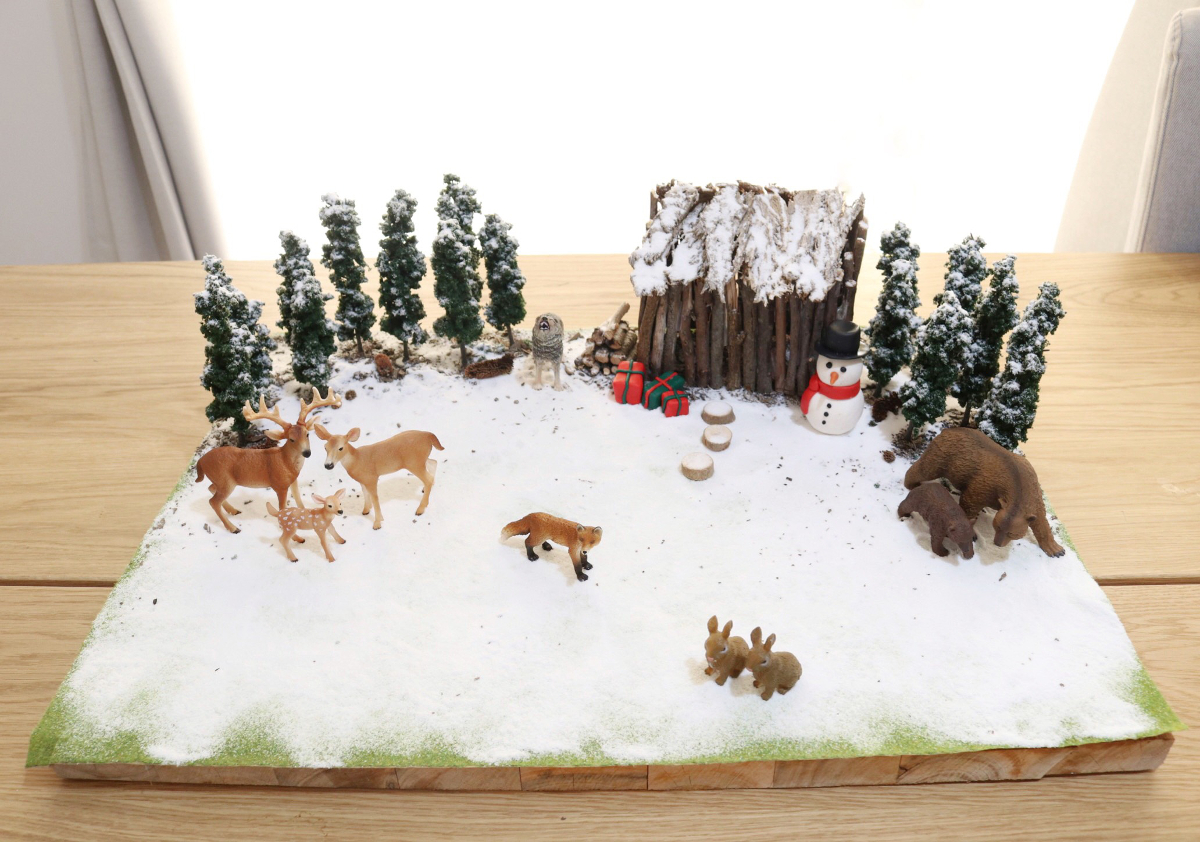
If you’d rather not create your own snowman from clay, Papo supplies MiniZoo with a ready-made snowman complete with a red Christmas hat.
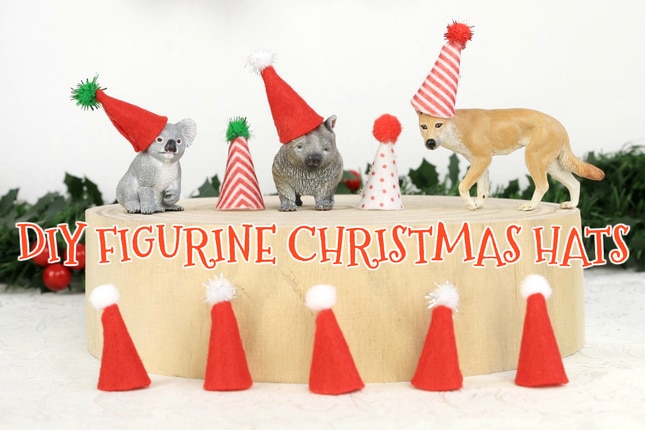
Speaking of Christmas hats, check out our blog from two years ago if you’d like to give the animals in your Small World some extra Christmas cheer. Naya shows you how to make hats for your animals – and it’s super easy. Just click the image here to have a look.
MiniZoo has everything you need this Christmas for decorating and for gifts too, from larger animals and kits to sweet little stocking fillers. With worldwide shipping and free shipping on qualified Australian orders you can easily find the perfect gifts to help you cross off a few things from your kids’ wish lists.
We’d love to see your Christmas small worlds so please share a photo with us on social media on Facebook or Instagram.
Merry Christmas and happy decorating!
Jenna @ MiniZoo
(PS: Always supervise little ones with small pieces e.g. miniature pine cones and small polymer clay made items, as they can pose a choking hazard).